4 Ways for Commercial Detailers & DIYers to Improve Polishing Results

4 Ways for Commercial Detailers & DIYers to Improve Polishing Results
For professionals in the commercial detailing space and DIYers alike, the polishing process is an important one. Whether you're furbishing the finish on an automobile or boat, or smoothing out the surface on a cabinet or countertop, the goal is the same: to achieve polished perfection as efficiently and simply as possible.
Fortunately, there are some clear-cut ways to get quality results without wasting excess time and energy. It's about working smarter, not harder. So if you're seeking the satisfaction of a flawless finish—garnered in the quickest, most simplified way—here are four valuable tips for both commercial detailers and DIYers to improve polishing results.
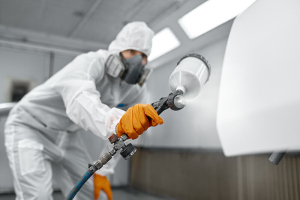
1. Opt for the right kind of polishing machine.
If you want exceptional results in less time for virtually any polishing application, it's paramount to work with a high-quality polishing machine. There are a range of polishers on the market, but your smartest option is an innovative system designed from insightful research and guaranteed to produce optimal results.
For the types of polishing applications we're discussing here, electrical polishers generally fall into three different movement categories. It's essential to understand the differences so you can best match your skill level and needs.
- Rotary: The disc rotates on a central axis, with the highest velocity being at the pad's edge. Rotary tends to be the most invasive movement on the surface, generating substantial friction and heat, which can lead to burns, strike-throughs and rotary-induced swirl marks if used improperly. In the hands of a skilled technician, a rotary tool features the lowest vibration levels of any tool movement. But it can take a great deal of time to learn to use the tool properly.
- Gear-Driven: The backing plate follows an orbit (the scope of which depends on the distance between the rotation axis of the drive shaft and the central axis of the rotor disc) and is simultaneously constrained to rotate about its own central axis, typically due to the inclusion of a gearing. The number of orbits at each revolution of the disc is always constant and depends on the parameters of the gearing used. The gear movement is more aggressive on surfaces with respect to the random orbital movement, and generates a generally higher vibration level.
- Random Orbital: The backing plate follows an orbit (the amplitude of which depends on the distance between the rotation axis of the drive shaft and the central axis of the backing plate) and is free to rotate about its own central axis. The backing plate is free to rotate at varying velocities and directions by effect of the centrifugal force of the offset movement and by effect of friction. Should the friction forces be such that they prevent rotation of the disc while the tool is still operating, the random orbital movement would simply become an orbital movement. The number of disc rotations is variable and independent of the number of orbits performed. The random orbital movement is at present the best compromise in terms of effectiveness and surface treatment quality. (Check out the Rupes Random Orbital Polisher Bigfoot Mark III and the Rupes Random Orbital Polisher Bigfoot Mini.)
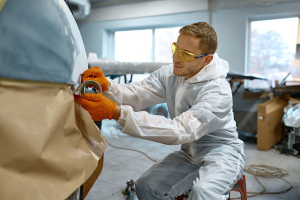
2. Pair your machine with the appropriate backing pad and polishing pad.
There are three critical components to a polishing system that should work together to produce low vibration levels and the best possible polishing results: the machine, the backing pad and the polishing pad. If you're using a high-quality system designed for maximum efficiency, ease of use and operator comfort, it's necessary to use backing and polishing pads that uniquely match the machine. This is the best way to maximize polishing results, ensuring that the tool has perfect balance and a minimized vibration level.
Using pads from a different family of products can reduce performance and further affect the technical and mechanical characteristics of the machine, changing its balance and increasing vibration. Increased vibration not only affects the comfort and overall safety of the user, but can also significantly diminish tool life.
Foam polishing pads range in variety (e.g., coarse, medium, fine, ultra fine) and should be selected based on the compounds, movement category of the machine and polishing application so as to ensure safety and efficiency. Each foam pad should be swapped out for a clean one after completing a section so as to ensure you're not spending extra time going over the same area and getting subpar results.
3. Choose your polishing compounds wisely.
Polishing compounds require a unique formula to assure that the product has the right combination of viscosity and aggressiveness. You want to select a product with these optimal compositions and consistency in order to achieve uniform distribution on the polishing pad. Different types of compounds are available to satisfy particular polishing needs, so be smart about selecting the product that meets the requirements of your project:
- A coarse compound is recommended for first-step polishing. This grain is the most “aggressive” of the abrasives and used for the rapid removal of marks and scratches. Coarse compounds are also effective at restoring paints and creating a high degree of gloss.
- A medium grain abrasive compound is applied to easily repair minor surface scratches and minor scoring from sources such as car wash brushes. This type of compound can be used with confidence that it will not leave halos or holograms.
- A fine compound is the more ideal composition for perfect finishes on particularly hard clear coats. A water-soluble abrasive compound in this category is best for totally eliminating paint defects and for a hologram-free final step of spot repair, following the micro-abrasive nib removal process.
- An ultra fine compound is specifically geared toward the final finishing pass, and its level of abrasiveness has the capacity to generate a deep lustre and color depth. A water-soluble product allows for easy removal of any residue.
4. Properly prime your polishing pad.
By priming your polishing pad first, you're able to prevent extra sling from the product, plus protect against dry buffing, burning and so forth. The easiest way to prime a fresh pad (already secured to the polishing machine) is by applying your polishing compound in little lines that start from the center of the pad and move outward to the circle's edge. Once the lines are drawn, use a tool to spread the compound around the entirety of the pad, evenly distributing as you go.
Next, set your polishing machine on a low setting and hold it lightly while applying the pad to a polishing surface. Allow it to spin in the same spot to ensure the compound spreads out over the pad. You can stop to add more compound, if needed, and repeat the same process to cover the pad surface evenly. Once the pad is fully primed, you only need pea-sized amounts of product on the pad to begin the actual buffing process.
With these four valuable tips for commercial detailers and DIYers, you're better positioned to get the highest quality polishing results in the least challenging and time-consuming way. Be sure to leverage this information to maximize performance for any polishing application.
For detailed information about how our products can optimize your polishing efforts and results, visit our product page or reach out to our team of experts.