Structural Adhesive How-To: Instructions for Using Concrete Repair

Concrete stands tall as one of the most durable and widely used structural materials, given its exceptional strength and longevity. Even so, concrete succumbs to wear and tear over time, resulting in cracks, chips and spalling that can compromise both aesthetics and structural integrity. In these instances, a suitable structural adhesive can be integral to mending and strengthening the damaged material. It's necessary to have a solid understanding of how this type of solution works and how to properly apply it for effective concrete repair.
Understanding Two-Part Urethane Adhesive
When it comes to concrete repair, selecting the right structural adhesive is paramount to achieving a long-lasting and reliable solution. Among the options available, two-part urethane adhesive combines the necessary strength, flexibility and ease of use, offering a host of benefits for addressing concrete damage.
Two-part urethane adhesives cure chemically, rather than relying on moisture from the air. Because of this, they can cure quickly with no depth of cure issues (unlike one-part urethane adhesive sealants). Urethane adhesives will bond most common materials, such as wood, metals, rubbers, leather, tile, glass, many plastics and, of course, concrete. They will maintain bond strength integrity through variable environmental factors, such as temperature, moisture and chemical exposure.
Perfect for applications requiring this type of solution, 3M™ Scotch-Weld™ Concrete Repair DP600NS is a quick-curing, two-component polyurethane adhesive designed to repair cracks, spalls and breaks in concrete, masonry and stone. It is also effective for use with pool decks and patios, custom tapping of bolts and screws into a variety of substrates, and setting anchors in horizontal and vertical surfaces. The gray-colored, two-part, non-sag adhesive bonds through a chemical reaction that cures to any depth without cracking, and it sets in as little as five minutes (full cure in one hour), eliminating down time without lengthy disruptions to day-to-day services.
How to Dispense Concrete Repair Adhesive
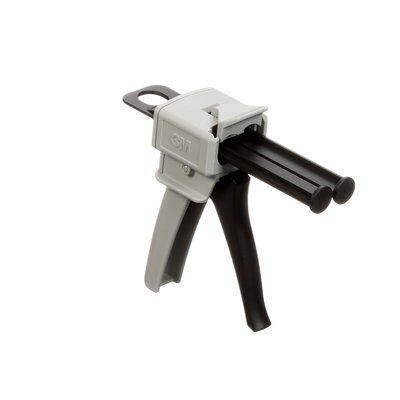
As 3M™ Scotch-Weld™ Concrete Repair DP600NS is a two-part component system, it comes in a Duo-Pak cartridge that keeps the components separate until ready for mixing (so as to maximize working time). Dispensing of the solution can be done with a regular caulk gun or with the easy duo-pak cartridge system.
To use the cartridge system, simply insert the duo-pak cartridge into the 3M™ Scotch-Weld™ EPX™ Manual Applicator. Remove the duo-pak cartridge cap and expel a small amount of adhesive to be sure both sides of the duo-pak cartridge are flowing evenly and freely. If simultaneous mixing of Part A and Part B is desired, attach the EPX mixing nozzle to the duo-pak cartridge and begin dispensing the adhesive.
With the squeeze of the trigger, the components are automatically mixed via the innovative mixing nozzle. It is then easily dispensed—precisely where needed and without an unwanted mess. The bubble-free liquid begins curing immediately while also self-leveling to create a tough, non-brittle bond. You can store any leftover adhesive with the used nozzle in place to provide a good seal. When you're ready, replace it with a new nozzle to continue using the remaining adhesive in the cartridge.
Detailed Installation Instructions
Effective concrete repair—or application of this structural adhesive for other uses—requires planning, preparation and a systematic approach. Following are critical step-by-step installation instructions for properly applying the two-part urethane adhesive.
CONCRETE REPAIR
Preparing the Concrete for Vertical Repair and/or Custom Tap:
- Remove all loose aggregate, dust, old caulks, grease and waterproofing compounds from the repair surface. (Grind away any absorbed oils to ensure a clean surface.)
- Clean the repair surface with a bristle brush and use moisture and oil-free compressed air to blow out debris.
- Mask off the area surrounding the repair.
Repairing Concrete Damage from Corrosion:
- Apply a pre-coat of cement corrosion inhibitor or protectant to excessively corroded areas.
- Allow the pre-coat to dry thoroughly.
- Follow the procedure for general concrete repairs.
Self-Leveling Procedure for Concrete Repairs:
- Keeping the mixer tip at the deepest portion of the repair area, dispense into the prepared cavity, depression, void, groove or crack.
- Keep the end of the mix tip immersed in the product as the repair is being filled.
- Use a spreader to cover the repair and leave an excess of at least 1" around the repair edges. Overfilling the adhesive and allowing it to overlap approximately one inch along the edges of the repair (tapering to just a few mils thickness) provides a substantial tie into the concrete and increases the lifetime of the repair.
- Place the spreader over the filled repair.
- Press down and hold for about 30 seconds to spread the repair compound.
- Let the repair cure before removing the spreader.
- The adhesive will self-level and set within approximately one minute, leaving a slight meniscus. If desired, create a repair flush and level to the concrete floor on smaller areas up to 6 inches square by overlaying a slightly stiff polyethylene sheet (approximately the modulus of a plastic spreader) just prior to the set of the adhesive.
- At 75°F (24°C), a 1/4"-thick section sets and becomes tack-free within 4 minutes and will cure within 1 hour. Note: Thicker masses or substrates at higher temperature take less time to cure, while thinner masses or substrates at lower temperature take more time to cure.
Repairing Leading Edges on Steps and Stairways:
- For sharp edges: Follow the procedures above and shape the edges by using two spreaders. Use one spreader to flatten the vertical edge of repair and the other spreader for the top of the repair.
- For round edges: Form round edges with a piece of plastic contouring sheet on small repairs (less than 3" x 3"). Plastic must be at least 1" larger around than the edges of the repair.
Repair Clean-up and Finishing:
- Remove masking tape from the repair.
- Shave or grind cured product with 36-grit sandpaper to achieve desired shape.
- Sand with 80-grit sandpaper to remove any scratches.
- If the adhesive is applied in a traffic area, apply sand or some type of grip to the repaired surface area.
CUSTOM TAPPING & FASTENING
Preparation for Custom Tapping:
- Drill holes into the concrete, wood or masonry to the specified depth using the chart below.

- Use a round bristle brush to clean the cored holes if they have not been freshly drilled.
- Use moisture-free and oil-free compressed air to blow out the debris.
- Lightly coat the bolts or screws with 3M™ 5-Way Penetrant.
Procedure for Custom Tapping Concrete:
- Dispense 3M™ Scotch-Weld™ Concrete Repair DP600NS into the hole nearly halfway full. To obtain a consistent fill, judge for underfill or overfill by counting the number of squeezes of the trigger.
- Insert the bolt or screw within the first 20 seconds after dispensing. The paste characteristic of the adhesive will hold the bolt or screw in place until it cures. Once the work life has been exceeded, do not disturb the bolt.
- Move to the next hole to keep the adhesive flowing in the mixer tip. If material sets in the mixer tip, replace the tip and start dispensing again.
- The adhesive will become tack-free within 2 minutes and cure within one hour. Note: It is best to wait for one full hour before extracting the bolt or screw for securing the cupboards, wall hangers or other cabinetry in place.
- Allow the adhesive to fully cure before applying a load. The maximum torque recommended is 9.5 pounds.
Procedure for Custom Tapping Hollow Concrete Blocks, Wood or Masonry:
- Use a reinforcement patch to create a mesh net around the bolt. Leave at least a 1" excess of mesh abound the diameter of the bolt. Push the bolt and mesh through the hole.
- Remove the bolt and then fill the net ¾ full with 3M™ Scotch-Weld™ Concrete Repair DP600NS while slowly backing the nozzle out of the hole.
- Place the bolt in the hole and complete the fill, if necessary, to adjust for any underfill.
- Allow the adhesive to fully cure before removing the bolt and reinstalling it along with the supported load.
RE-ANCHORING HAND RAILS
Preparation of Hand/Grab Rails:
- Bore a hole through the base of the hand/grab rail just above grade level to allow introduction of the product.
- Using 80-grit sandpaper, roughen the footing surface of the hand/grab rail that is to be embedded below the concrete grade.
- Refer to instructions on cartridge for dispensing.
Preparation of Concrete for Re-Anchoring:
- Chip away the cracked or broken concrete to allow removal of the hand/grab rail.
- Leave the concrete as close as possible around the hand/grab rail. It is best to allow the concrete to remain intact as close as possible (within ½ to 1 inch all around) to the base of the hand/grab rail.
- Dig down to the base of the concrete, typically 4 to 6 inches deep.
- Expose any rebar, if possible, in order to create a ground connection to the rebar.
- Create as much as a 1-inch undercut under the concrete in a smooth taper from the concrete surface.
- Remove all of the loose concrete particles and dust prior to encasing the replacement hand/grab rail.
- Attach the replacement hand/grab rail to the surrounding rebar using a copper wire. Cinch the connection down tightly, allowing a slight amount of slack in the wire connection.
- Create a shield to corrosion at the base of the hand/grab rail by laying a piece of polyethylene plastic at the base of the hole.
- Insert the hand/grab rail in the hole. Align the hand/grab rail for its elevation and vertical plumb.
Encasement Procedure:
- Dispense 3M™ Scotch-Weld™ Concrete Repair DP600NS into the concrete hole. Product will remain liquid for approximately 50 seconds, and fully cure in 1 hour. Dispense more cartridges as necessary to bring the fill level up to the concrete surface level.
- Dispense the adhesive into the inside of the hand/grab rail. Fill with product up to and slightly above the grade level. (Filling the inside of the post provides extra strength and protection against corrosion.)
- Apply cement dust or sand, if desired, to blend the surface appearance into the surrounding concrete. If the adhesive is applied in a traffic area, apply sand or some type of grit to the repaired surface area.
Repair Clean-up and Finishing:
Shave or grind the cured product with 36-grit sandpaper to achieve desired shape.
For more detailed information about how 3M™ Scotch-Weld™ Concrete Repair can support your structural adhesive needs, visit our product pages or reach out to our team of experts.