Improve Your Wood Sanding Results
Improve Your Production Operation
With These Wood Sanding Supplies
Sanding is a surprisingly complex operation. It requires a variety of different tools, depending on the type of material you're working with - wood, metal or composite. Use the wrong tool and you run the risk of ruining your materials - and getting completely off track with your production schedule. There are a variety of factors manufacturers need to consider when working with wood.
Here are some tips to follow when sanding and finishing wood surfaces:
 We know your time is valuable. We'd love for you to read the whole blog, but if you don't have time, check out our 30-Second Summary
Creating A Smooth Foundation
Unless you are starting with plywood, building a fine finished wood product starts by running it through a thickness planer. This smooths out saw marks, cleans up rough areas, straightens out any uneven surfaces and produces boards with an even caliper.
It also can leave lines and chatter marks in the wood that will need to be removed. If the blades are a little dull, planers can also burnish the grain, which keeps the stain from penetrating properly. When building large furniture, it's often good practice to sand components prior to assembly but ultimately this depends on your process and equipment.
Removing Major Imperfections
As a second step, you may need to do a round of sanding to replace planing or remove any major imperfections. To do this, the wooden planks are held in place as a conveyor feeds them through abrasives that grind away from above.
This process is very effective at removing a large portion of wood in a single pass. Some machines have second abrasive heads with a finer step that refine the scratch and make finishing quicker.
When selecting sanding supplies, choose coarse grits in the range of 36-60 grit using alumina zirconia or ceramic grains and at least 50 horsepower per head. If you've already used a knife planer, the usual starting point is 80-100 grit with aluminum oxide or ceramic mineral and up to 25 horsepower per head.
A second head running 120-150 grit refines and cleans up the wooden surface. Now it's ready for finish sanding, either by hand or with a random orbital sander. Ideally you could sand to a final finish with a wide belt sander but the belts oscillate to keep them tracking correctly and this leaves a wavy scratch pattern that must be refined.
Alternatives To Belt Sanders
For shops that don't have a wide belt sander, you can use a stroke sander. These machines use long narrow belts with a sliding table to support and move the wood while a block pushes the abrasive belt by hand into the wood.
Automatic stroke sanders use long pneumatic platens to push the wood through while other machines have an arm attached to the block, giving better leverage to the operator. Stroke sanders don't need to oscillate since the drive and idler wheels are highly crowned and the contact block is typically 8 by 10 inches, so the scratch is much longer. This means you can sand to a final finish more easily. As useful as they are, most shops choose to use random orbital sanders instead.
For a quick recap - here's what to use for each specific production need: abrasive planers are heavy stock removal machines, wide belt sander are for medium stock removal, and stroke sanders are typically medium to fine finishing tools. These are all large, heavy machinery requiring multiple horsepower motors, which takes up a lot of floor space. Wood is placed in these machines, so typically larger pieces or components are worked this way.
Smaller Options For Limited Space
When working in a smaller shop, there are alternatives to these larger machines. Portable belt sanders using 3- or 4-inch wide belts work well but aren't as popular. You often see block planes or power planes used for heavier cutting.
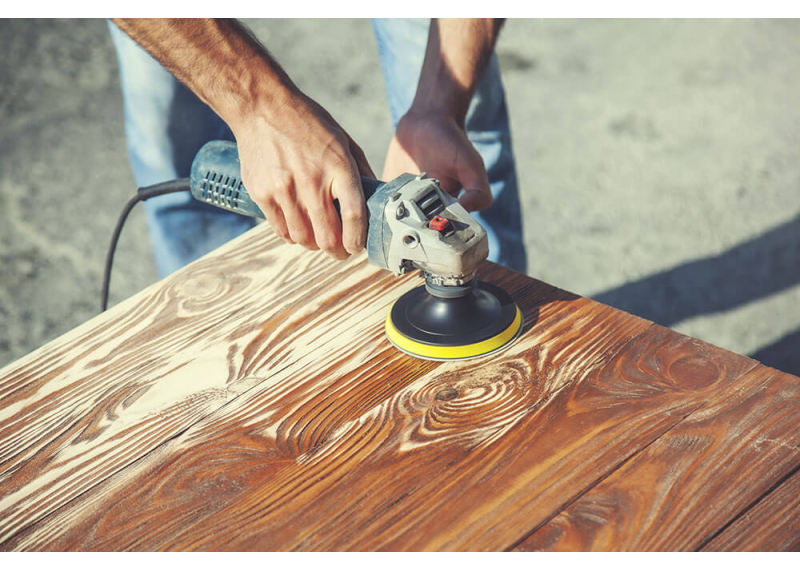
Edge sanders run the abrasive belt horizontally on the edge of panels, allowing the operator to clean up rough edges after a jointer. Combination belt and disc machines are pretty common because of their ability to do multiple configurations. Spindle sanders are great for inside curves and holes. But the most important advancement for wood finishing in recent years is the random orbital sander. It can be configured for a wide variety of uses from a heavy stock remover to a sanding primer or sealer.
Understanding Random Orbital Sanders Variables
There are several different types of random orbital sanders available. They differ in three key variables - horsepower, speed in orbits per minute, and most importantly, the orbit diameter.
The power is usually no more than ¼ horsepower but some get by with less. Orbits per minute are typically 10,000-13,000 per minute, and orbit diameter (the largest variable) ranges from 3/32-5/8”. Small electric random orbitals are low-power, high-speed machines that are well suited to sanding sealers. They suffer with small AC motors whose brushes drag and wear out, they have small dust collecting cups that are ineffective, and they rev quickly but are limited by small orbits.
Pneumatic random orbital sanders are a big improvement, though technically they were around first. These machines are two or three times the price of small electric models, but the difference in tool life makes them an obvious choice for professionals with large air compressors available. They are lightweight and since they are air powered, they run much cooler. Most manufacturers offer three orbit diameter choices, 3/32” for sealer or primer sanding, 3/16” for most other applications, and a large diameter of say 3/8” for heavy hogging.
Disc diameters are one inch for ‘nib' sanders, 5” for most industrial and marine users, 6” for auto body, 8” for some marine applications, and 11-1/4” for solid surface countertops. The newest random orbital sanders have brushless electric DC motors that have the same profile as pneumatic sanders with the same or more power.
Energy-Efficient Options
These tools have made huge strides in energy efficiency, especially those models built by Mirka or 3M. Pneumatic sanders require three-phase air compressors of at least 8 horsepower to run just a single tool, 10 horsepower for multiples, while the compact DC drive tools run on standard 15 amp 110 volt outlets. The price tag is around $550 per sander though, so up-front costs are a barrier to small shops or casual users.
Avoiding Cross Grain Scratches
When working with random orbital sanders and wide belt machines, a common issue is cross grain scratches. This becomes worse when sanding across the direction of the grain. To deal with this issue, use abrasives in the range of 150-180 grit (typically for clear finishes) and 220-280 grit for stained finishes.
When sanding, use light down pressure on the tool, moving slowly from side to side, and make sure your pneumatic sander is getting enough air to run at full speed. Slowing down the orbital action will create lots of “fish hooks”.
Choosing quality sandpaper also helps create a smooth final finish. Sharp, precision-coated ceramic or aluminum oxide grains will cut better, last longer and give a much better appearance for the final product. Using dust-free sanders and multi-hole or ‘net' discs keeps the air cleaner but also extends the life of your sandpaper because you aren't re-sanding your dust.
Hand Sanding Options
And while we've been focused on machine sanding, we can't forget to talk about hand sanding. It isn't as popular a method because it takes more time and effort, but it's still a necessary function in small or tight areas or to ‘“break edges” (dull down the corners and sharp edges) of wood.
In this situation, a product like Stikit sheet rolls is great because you can stick the paper onto a wide variety of soft or hard blocks, or simply fold its sticky sides together for a double-sided, stiffer sheet that works great by hand. Blocking down after a sealer coat is an excellent way to control how much coating you are removing, especially if the desired result is a seven coat spar varnish finish that looks like it was dipped.
While sanding wood products has been around for decades, it remains one of our primary building materials. Be sure to check www.cwhaydenonline.com for all the sanding supplies you need.
See Why We're The Top Supplier For Industrial, Marine and Safety
30-Second Summary:
- ✔ Sanding is surprisingly complex, and requires different products for different materials such as wood, metal and composite.
- ✔ Start by running your planks through a planer to remove the largest imperfections.
- ✔ Then it's ready for finish sanding, either by hand or with a random orbital sander.
- ✔ For shops that don't have a wide belt sander, you can use a stroke sander.
- ✔ There are several different types of random orbital sanders available. They differ in three key variables - horsepower, speed in orbits per minute, and most importantly, the orbit diameter.
- ✔ While most manufacturers use machine sanding, hand sanding is still necessary for specific functions like sanding in small or tight areas or to ‘“break edges” (dull down the corners and sharp edges) of wood.